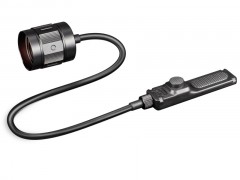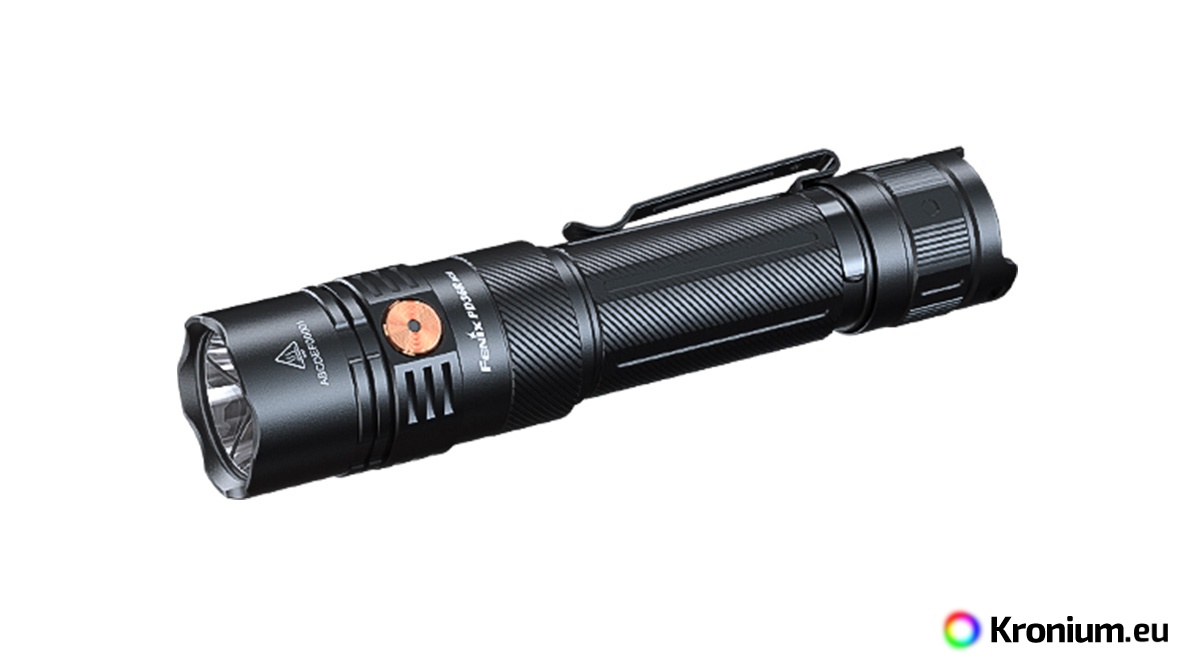
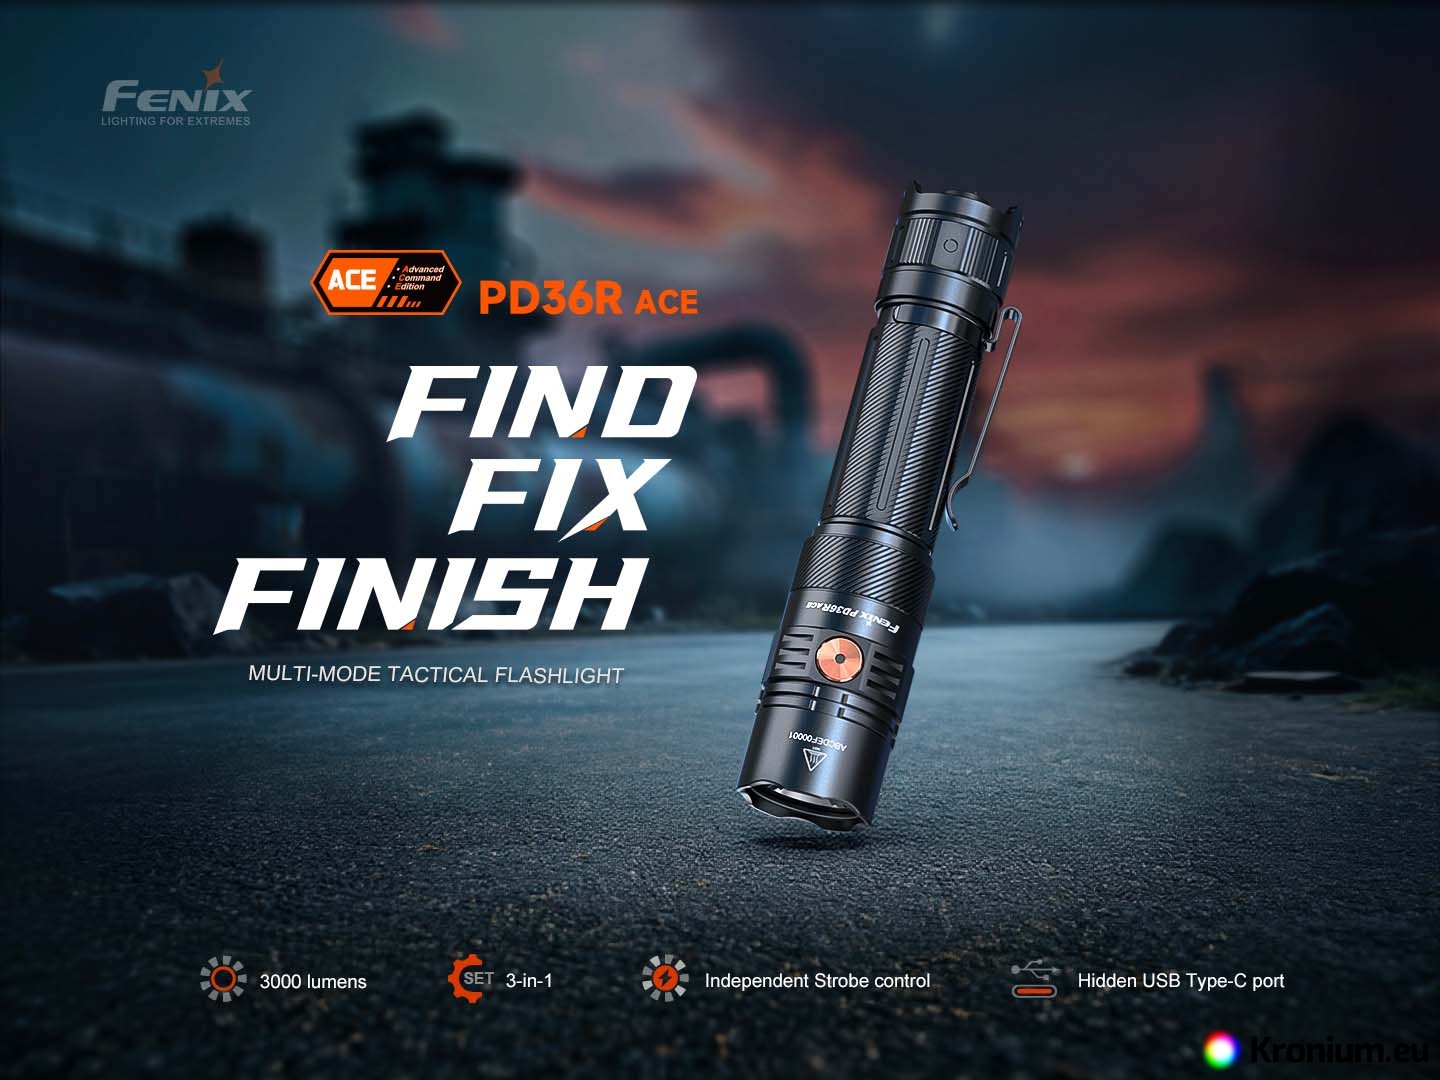


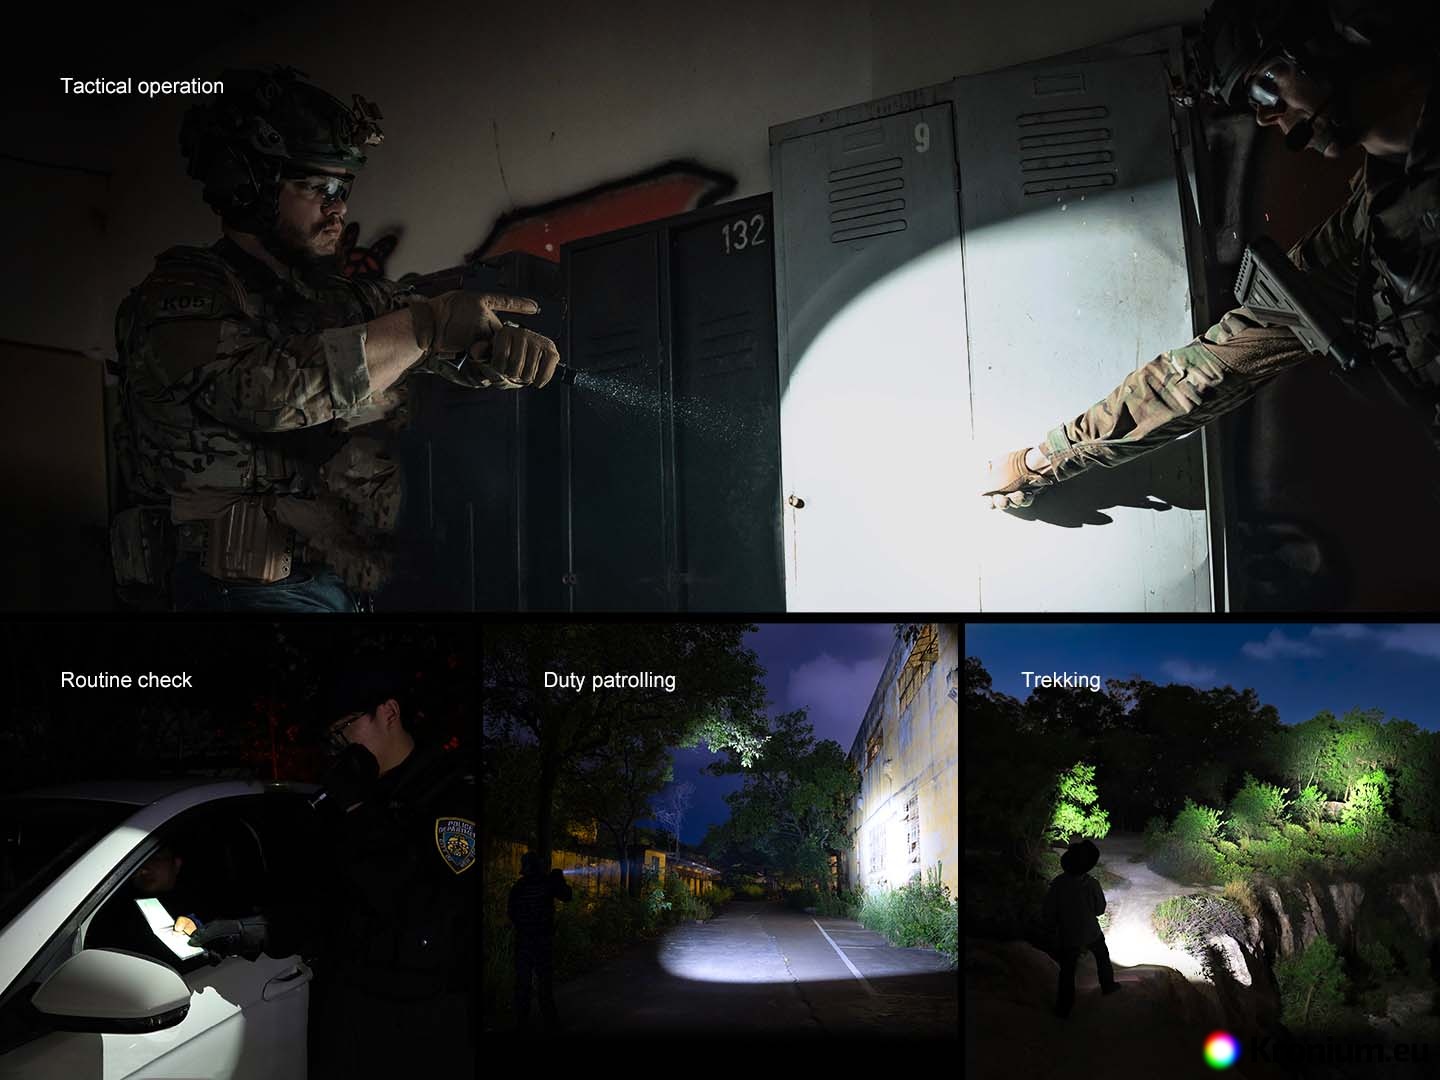
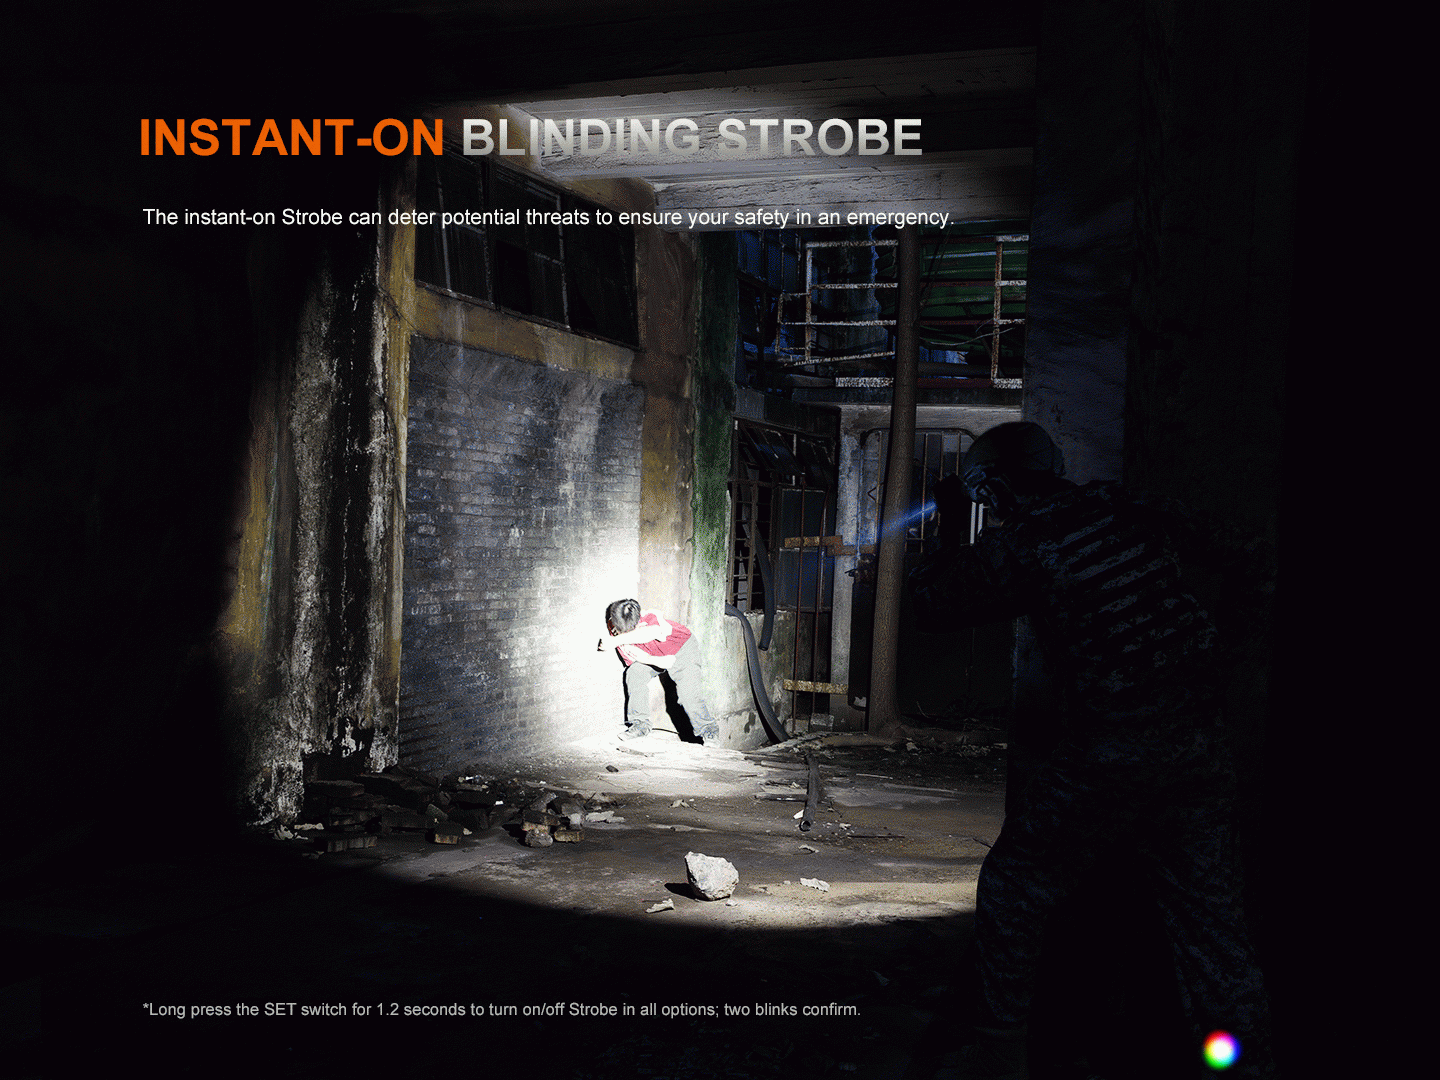
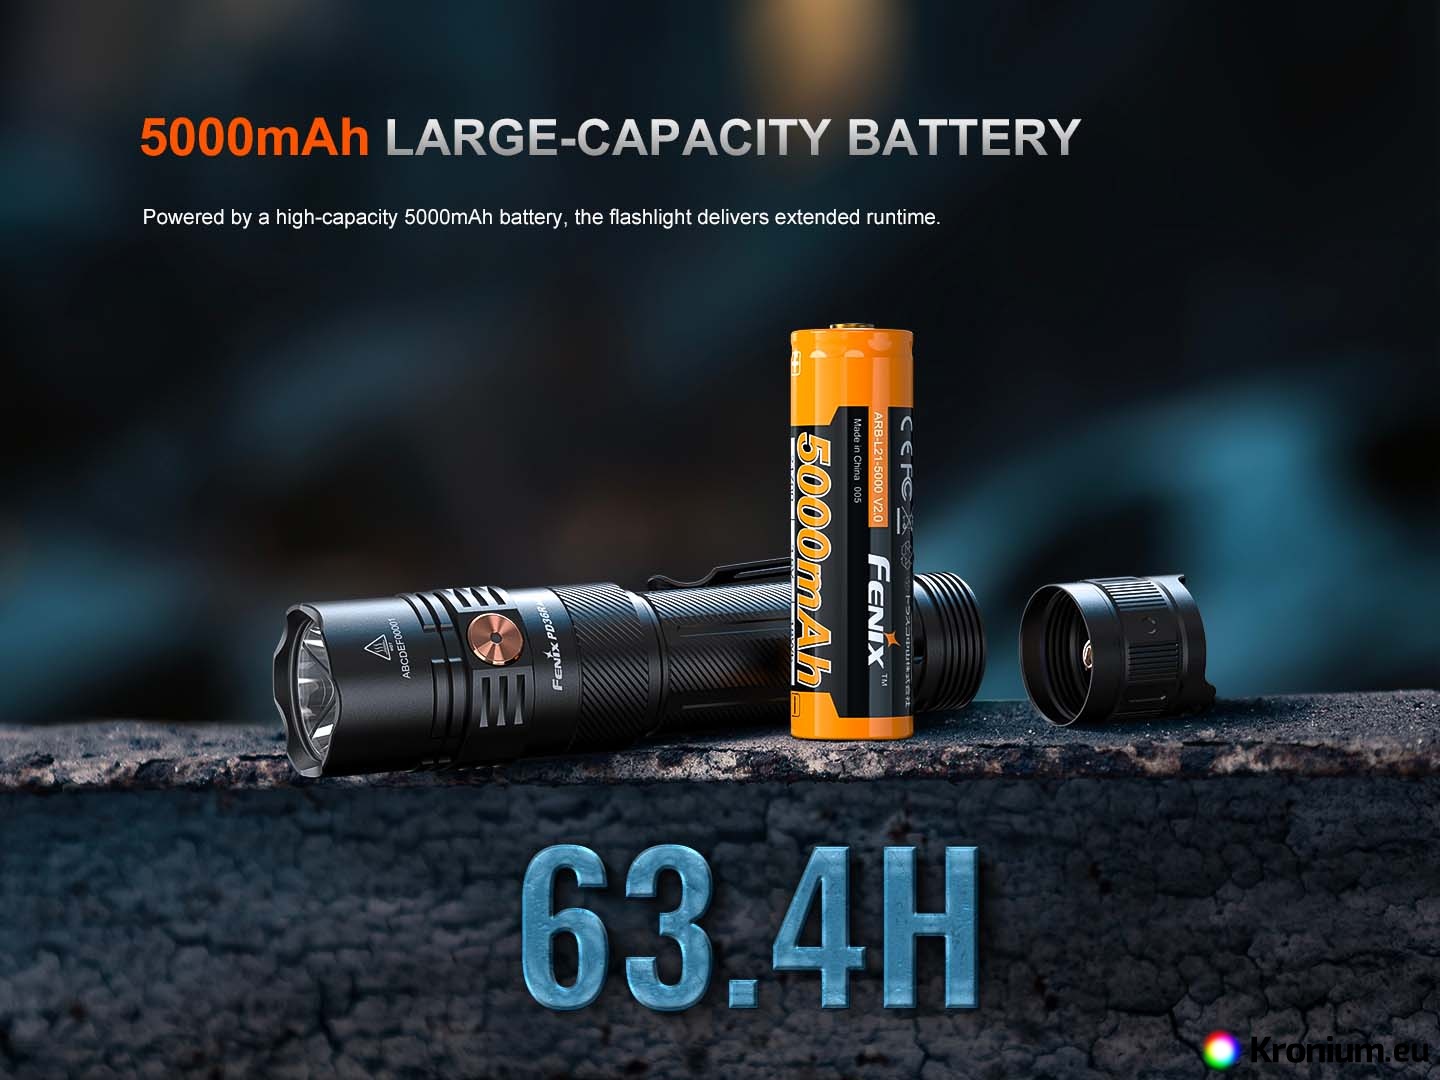
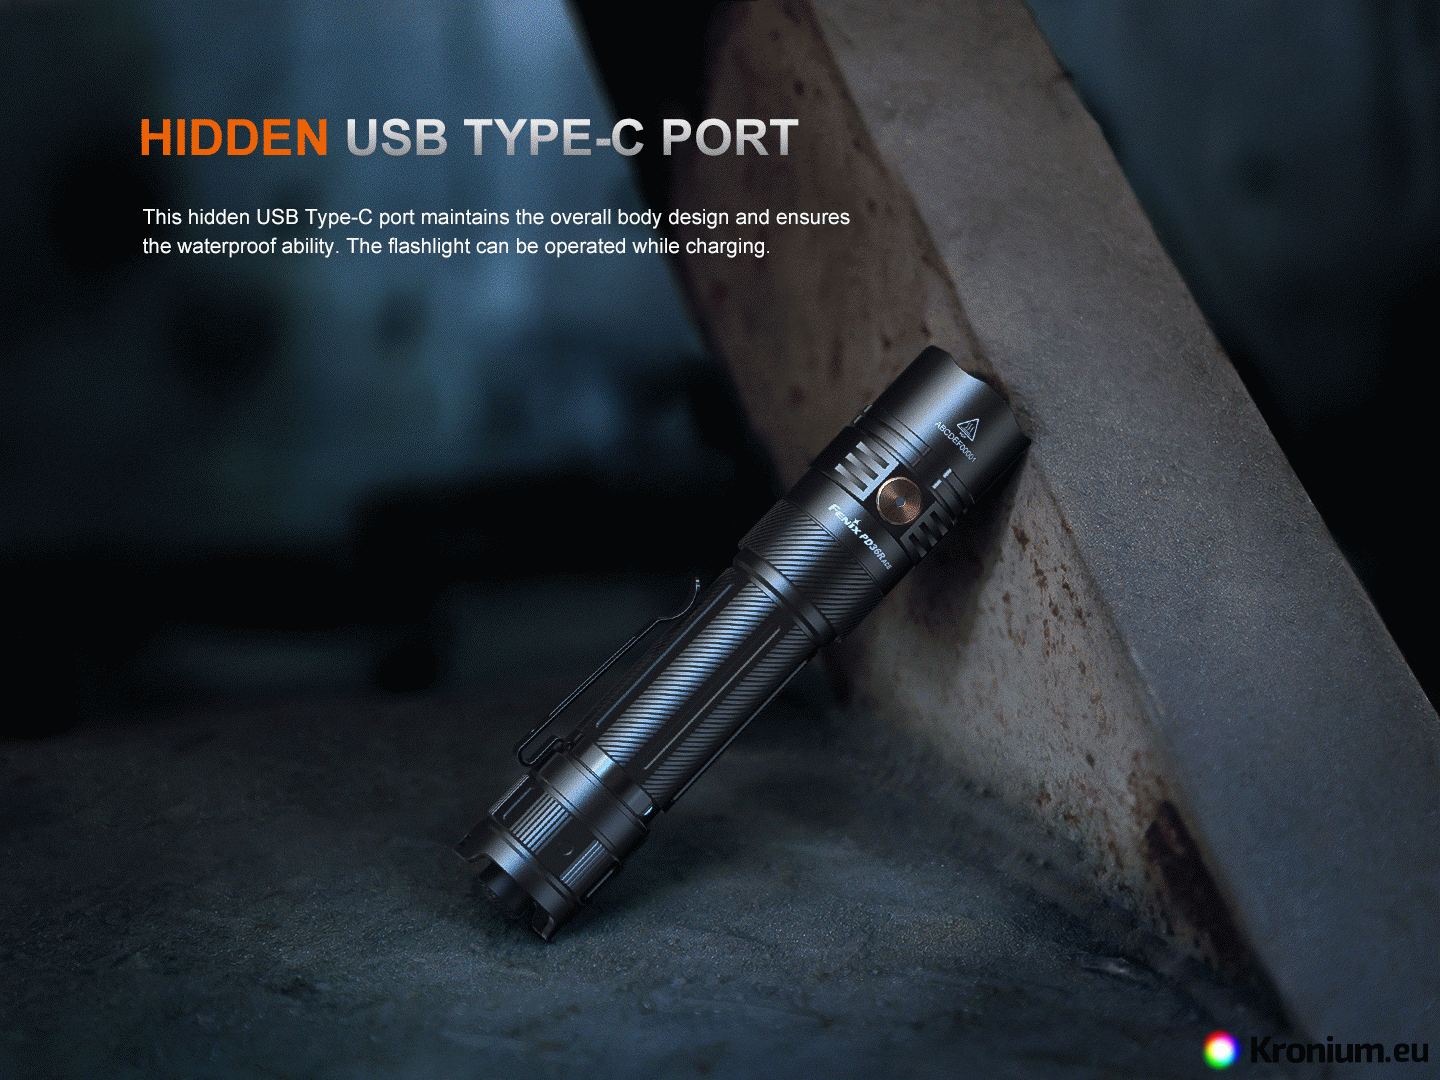
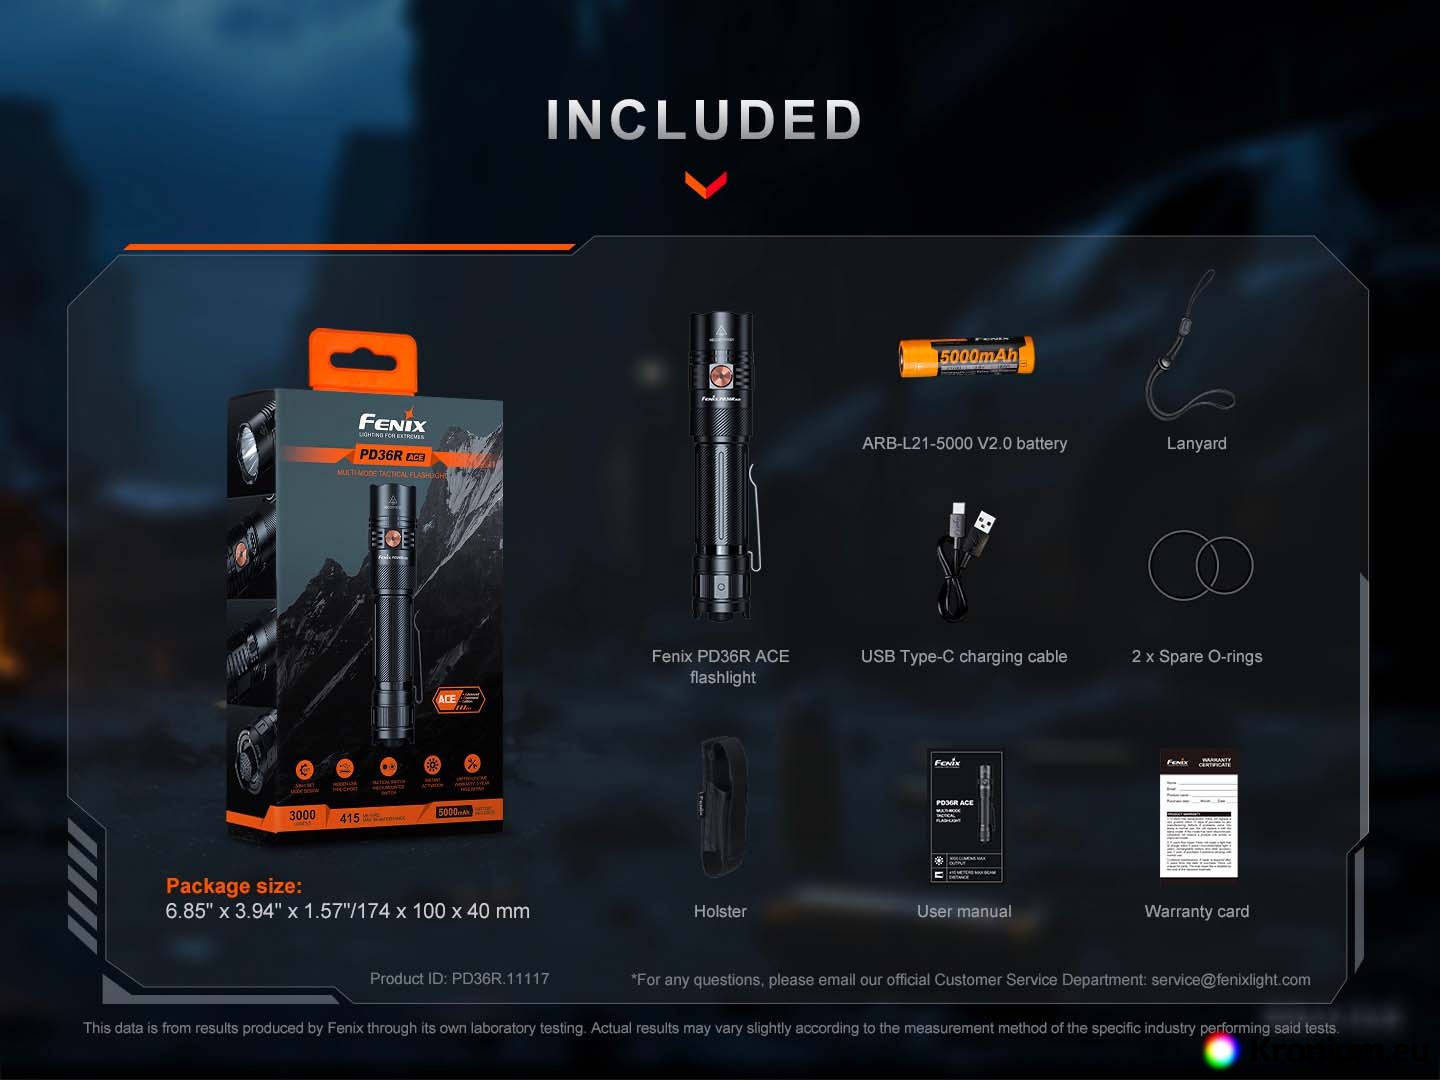

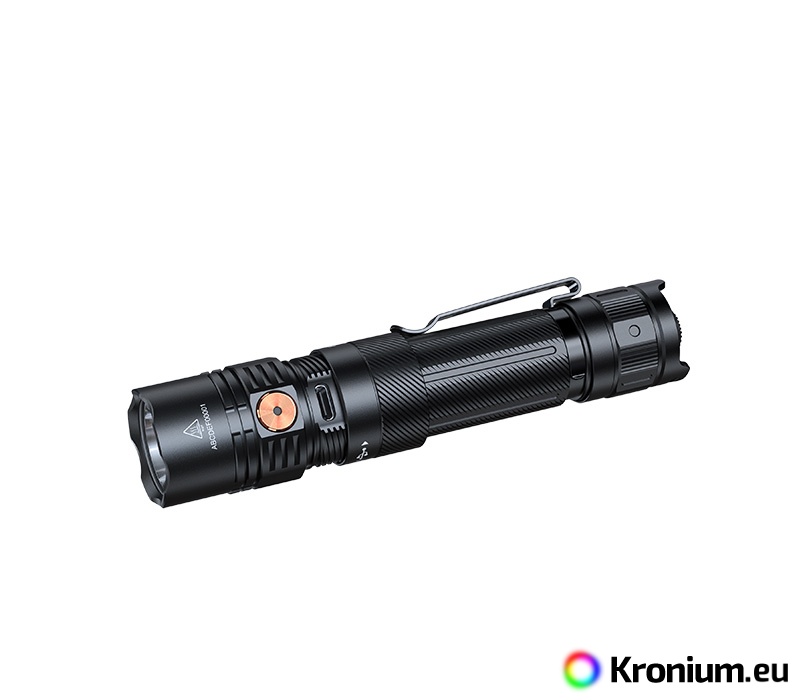
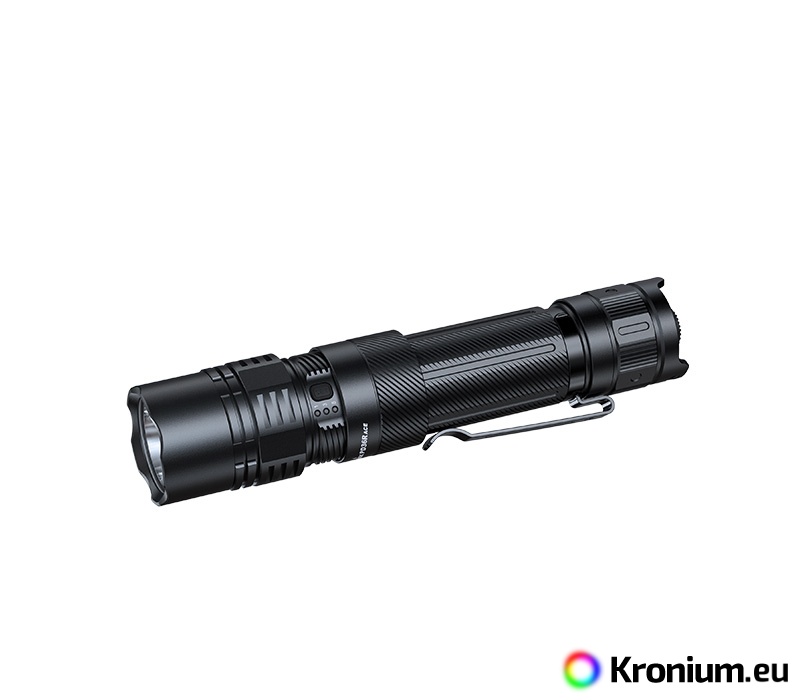
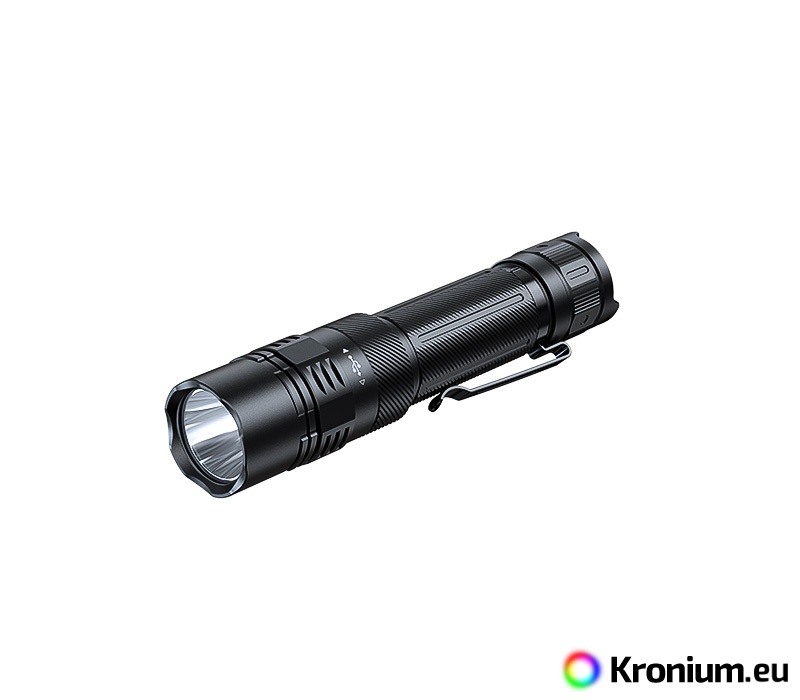
The high-performance Fenix PD36R ACE flashlight will dazzle you with a luminous flux of up to 3000 lumens (ANSI) and a beam distance of up to 415 meters. This excellent light output is provided by a premium Luminus SFT-70 LED. It is powered by a 21700 Li-ion battery with a capacity of 5000 mAh (included in the package), which can be conveniently charged directly in the flashlight via a modern USB-C connector. Under the durable screw-on cover that protects the USB-C charging port, there is also a unique SET programming button. With it, you can quickly customize the flashlight: choose one of three preset profiles – tactical, duty, or outdoor – and perfectly set the number of modes to suit your needs. The Fenix PD36R ACE offers up to seven different lighting modes, so you can always choose the optimal combination of performance and runtime. In eco mode, it can last for over 63 hours. For crisis situations, the SOS and strobe flash modes are invaluable. Thanks to its digitally regulated circuit, the flashlight provides a constant output even as the battery depletes, and you can easily check its status with the battery level indicator. The PD36R ACE is impressive not only for its compact size and stunning performance but also for its tactical tail switch and the ability to connect the Fenix AER-04 remote pressure switch. It is therefore an ideal choice not only for all outdoor enthusiasts but also serves well for members of the armed forces, security personnel, and hunters.
All flashlight parameters (luminous flux, battery life, waterproofness, beam distance, and impact resistance) are measured in accordance with the ANSI/NEMA FL 1-2009 standard.
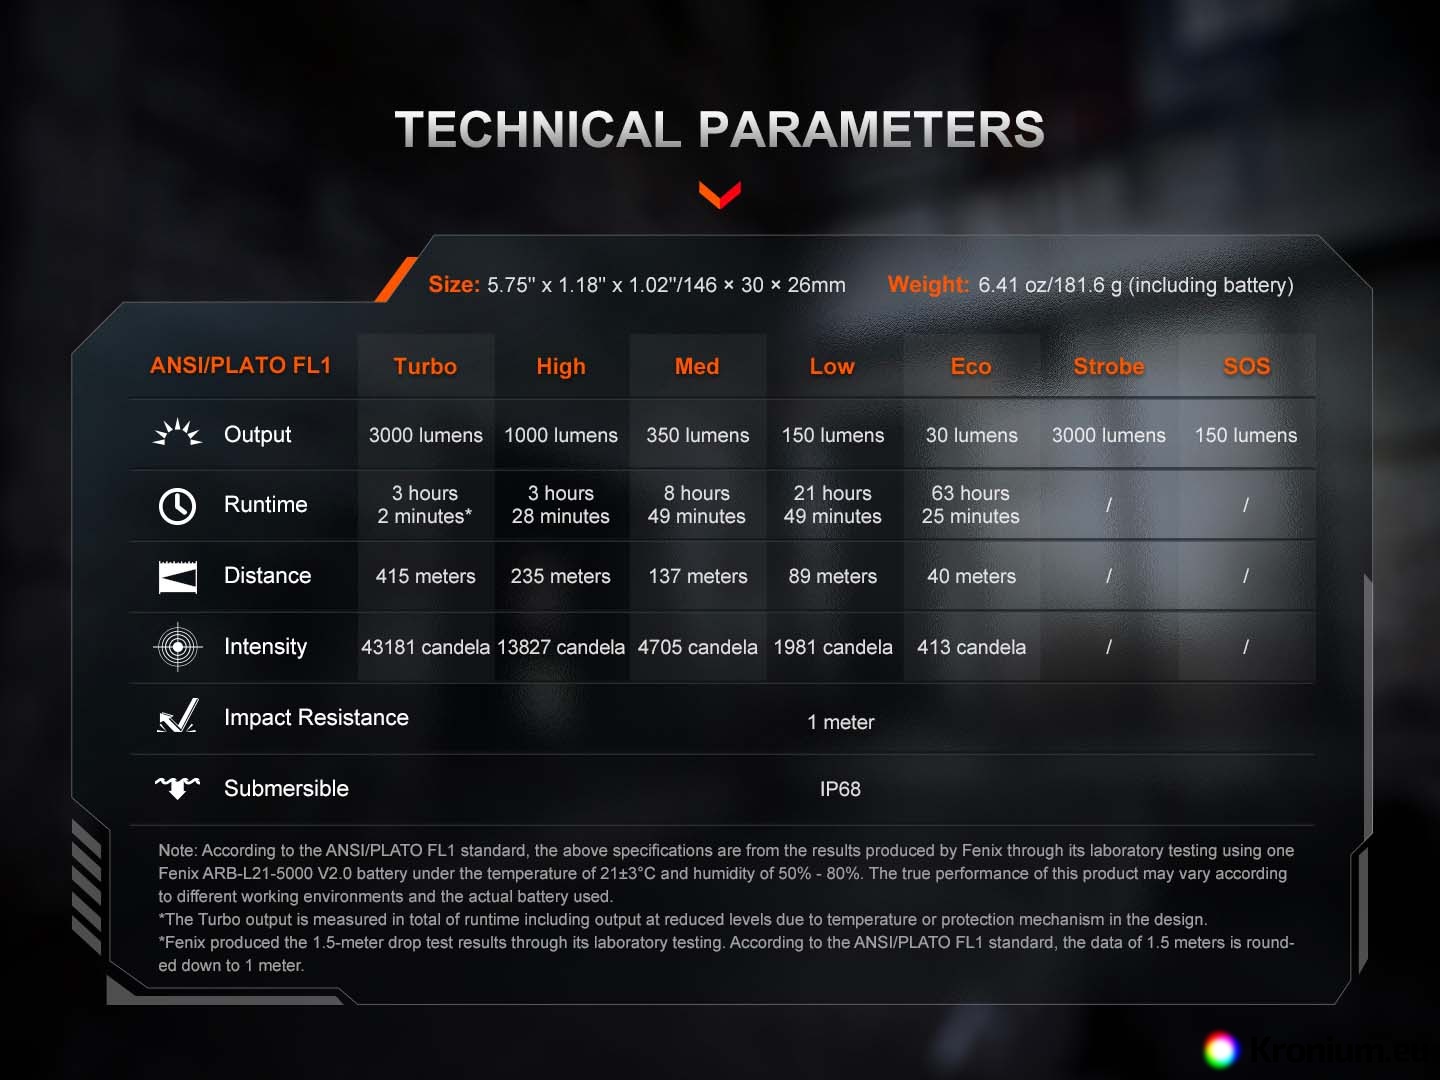
Fenix PD36R ACE Flashlight Parameters
- Uses a top-of-the-line, high-performance Luminus SFT-70 Gen2 LED with a lifespan of 50,000 hours.
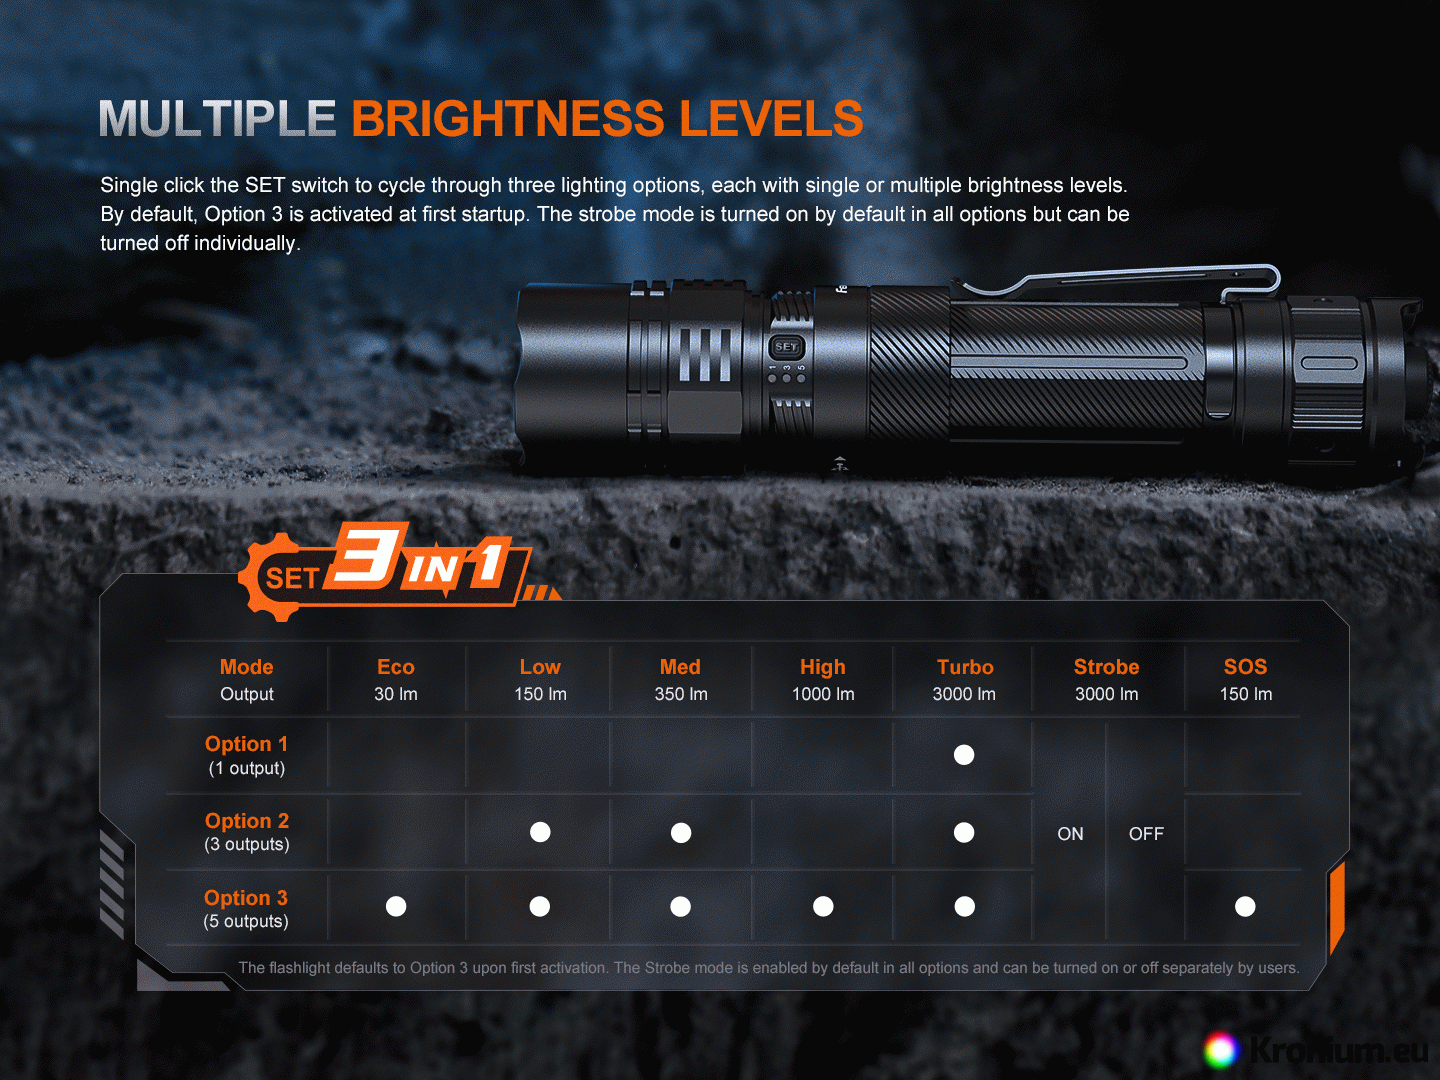
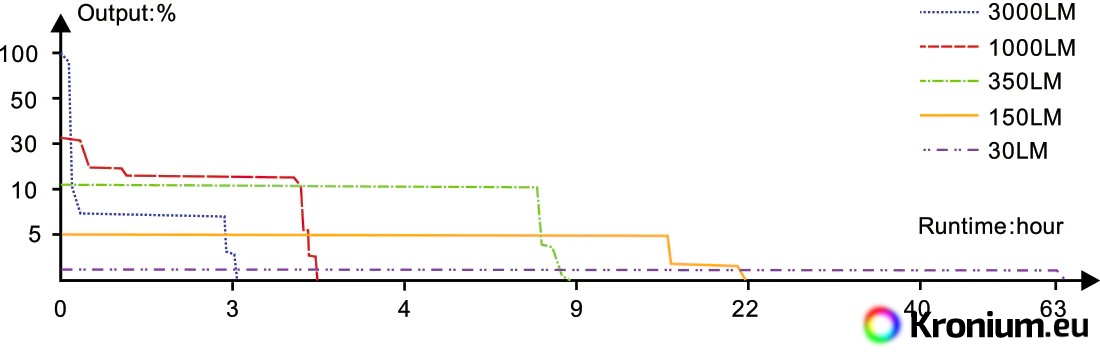
- Seven lighting modes: Turbo 3000 lumens (3 hours) – 1000 lumens (3.45 hours) – 350 lumens (8.8 hours) – 150 lumens (21.8 hours) – 30 lumens (63.45 hours) – Strobe (3000 lumens) – SOS (150 lumens).
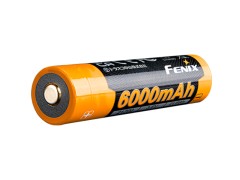
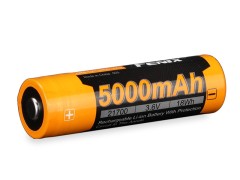
- Luminous flux and runtimes are measured with the included Fenix 21700 5000mAh Li-ion rechargeable battery (included in the package).
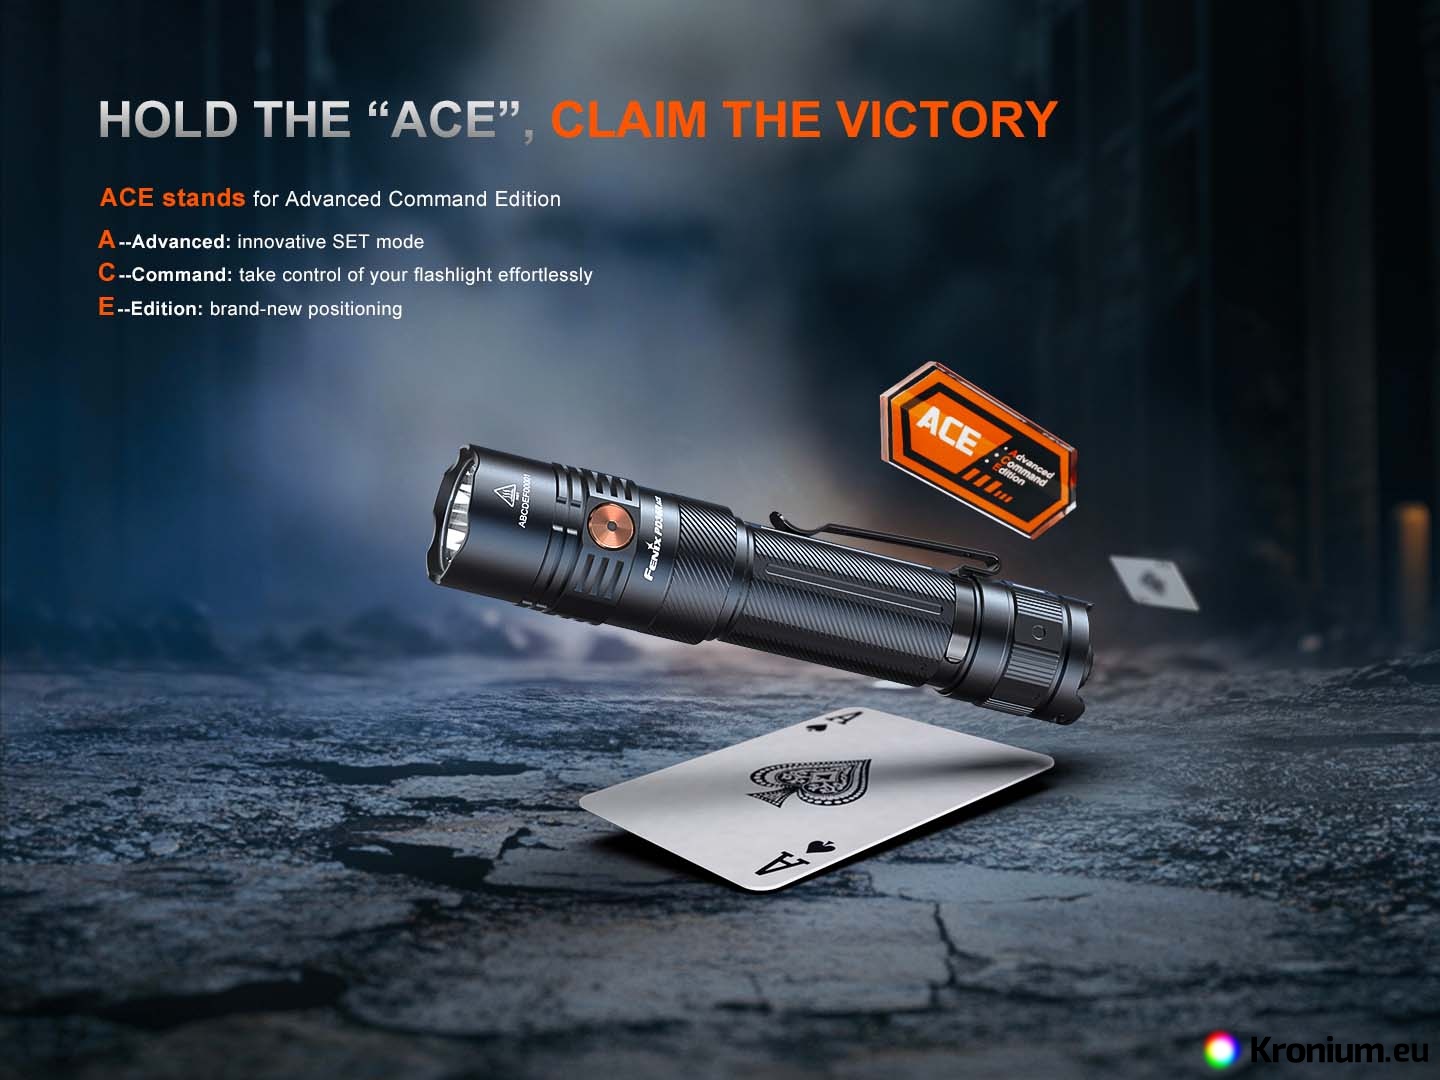
- Programmable - choice of three preset profiles – tactical, duty, or outdoor.
- Digitally regulated for constant brightness, with intelligent overheat protection.
- Power source: one 21700 Li-ion battery.
- Smooth parabolic reflector for a light beam with a distance of up to 415 meters (43,181 cd).
- The flashlight has a memory function and always turns on in the last used mode (does not apply to strobe).
- The LED indicator in the side button displays the battery status every time the light is turned on.
- Trapezoidal threads with increased wear resistance.
- Dimensions: 14.6 cm (length) x 2.6 cm (body diameter) x 3 cm (head).
- Weight: 181.6 grams (including battery).
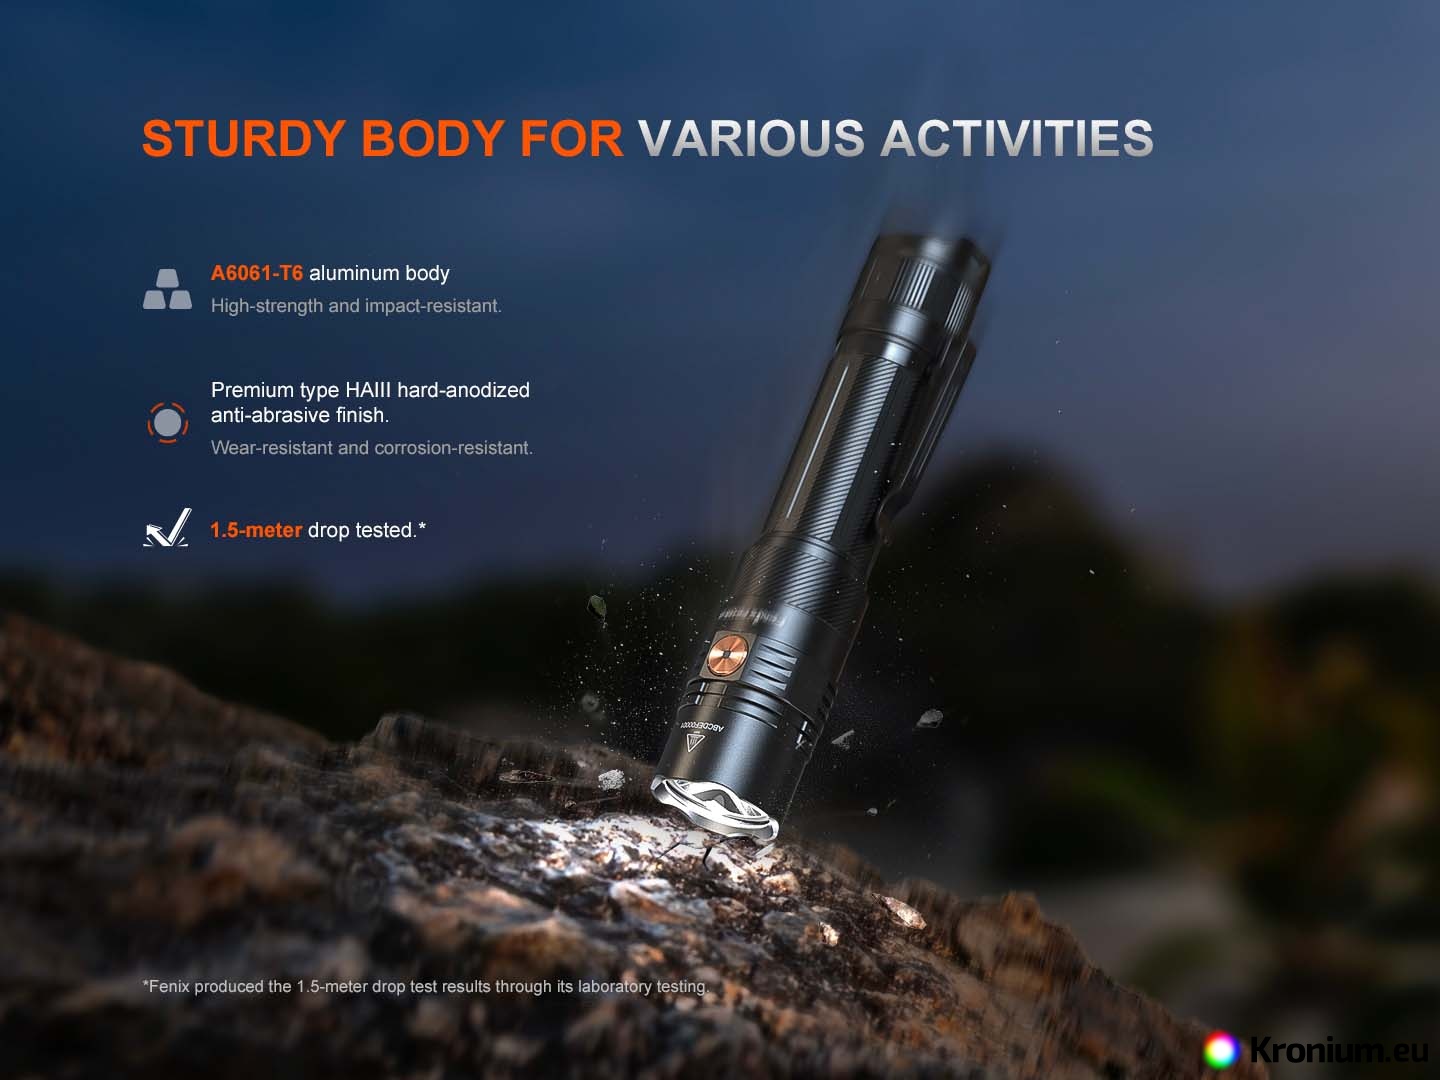
- Made of aerospace-grade hardened aluminum, durable finish - Type III hard anodized.
- Impact resistant to falls from 1 meter.
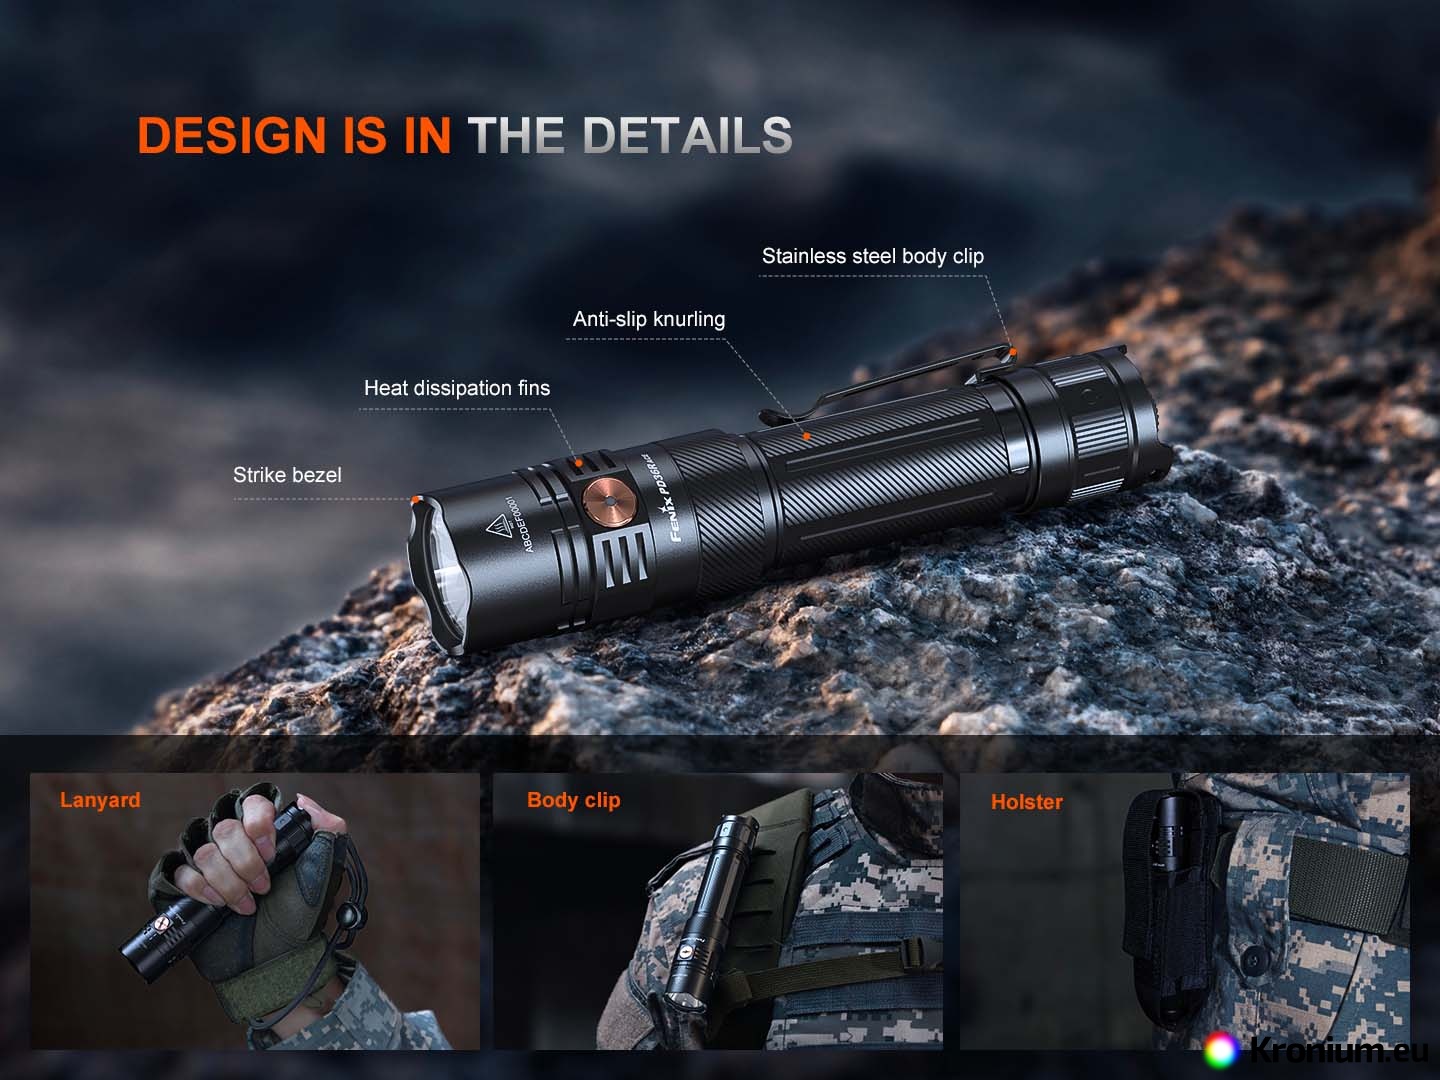
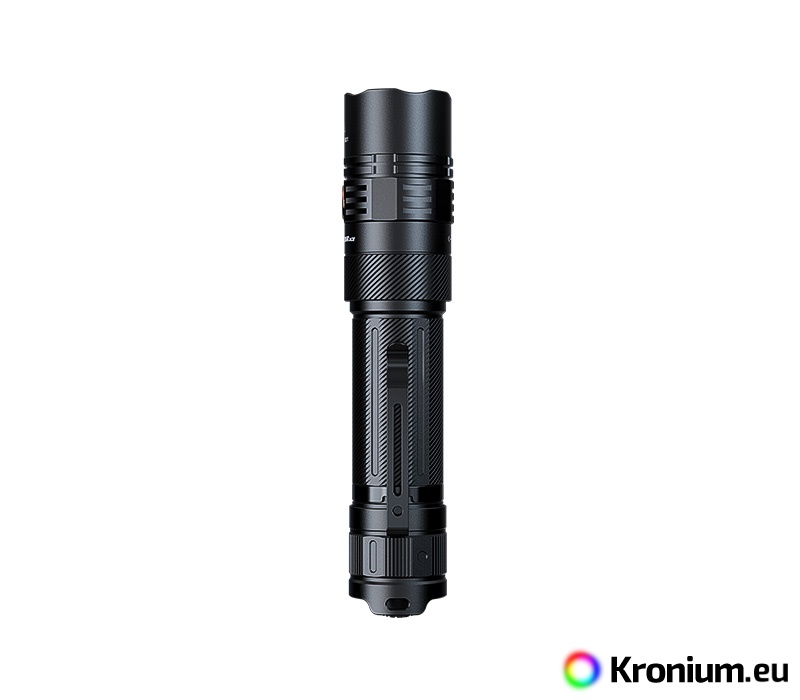
- Distinct knurling on the surface for a better grip; the design prevents the flashlight from rolling on uneven surfaces.
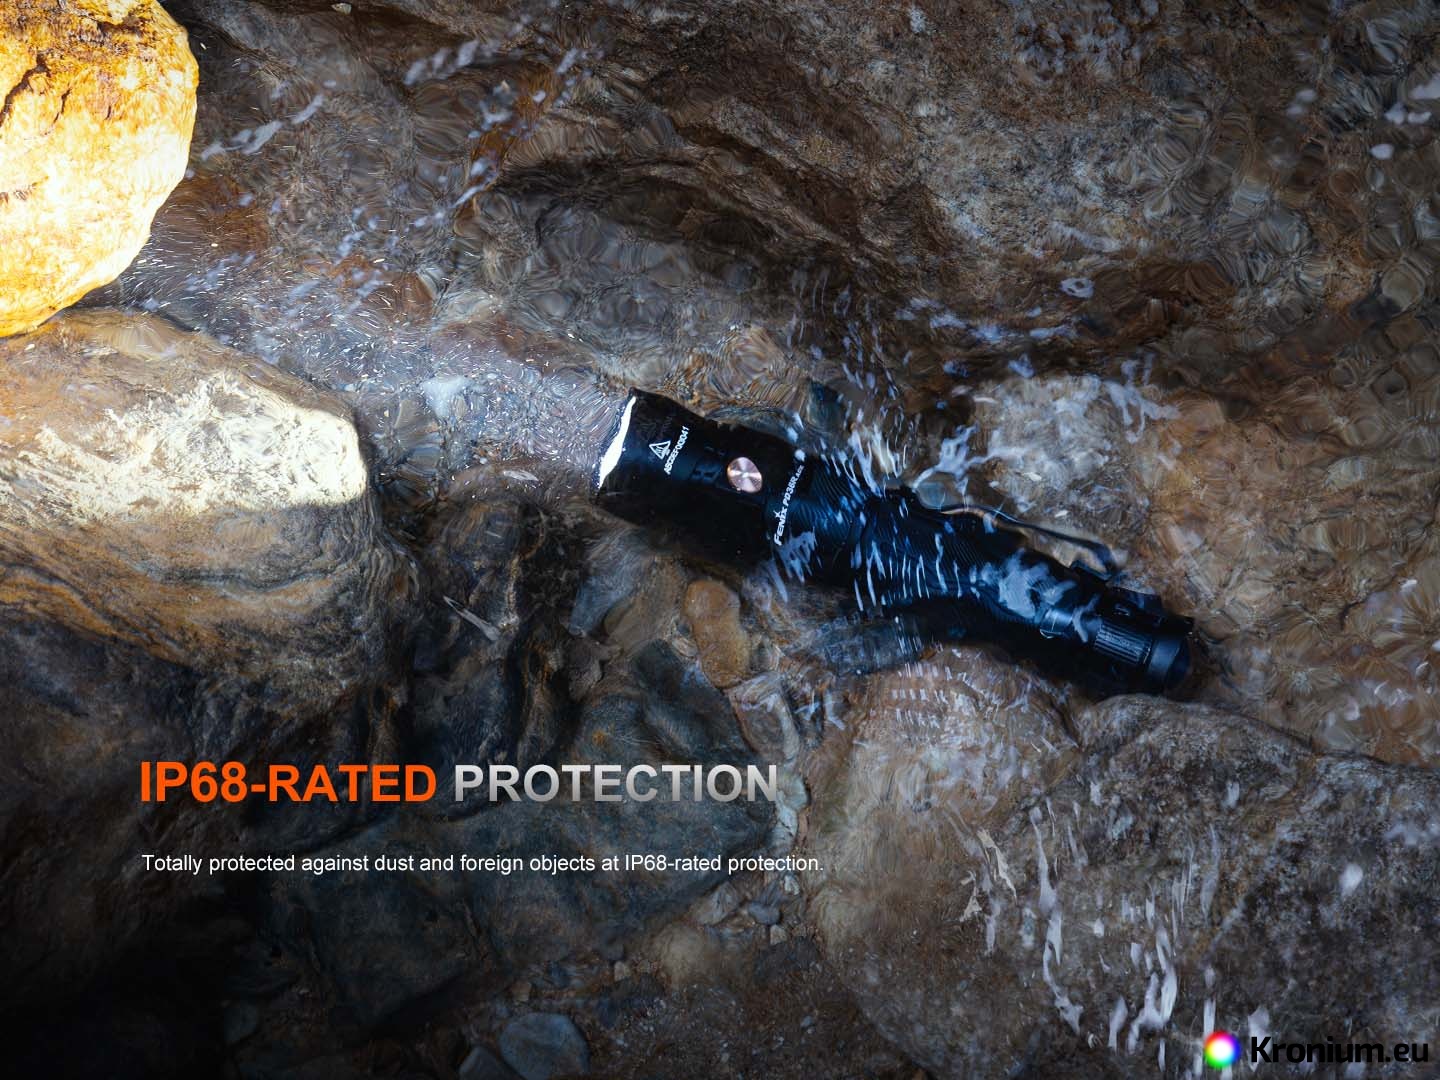
- Waterproof and dustproof according to the IP68 standard (tested underwater at a depth of 2 meters for 30 minutes).
- Removable steel clip.
- Toughened ultra-clear glass lens with an anti-reflective coating.
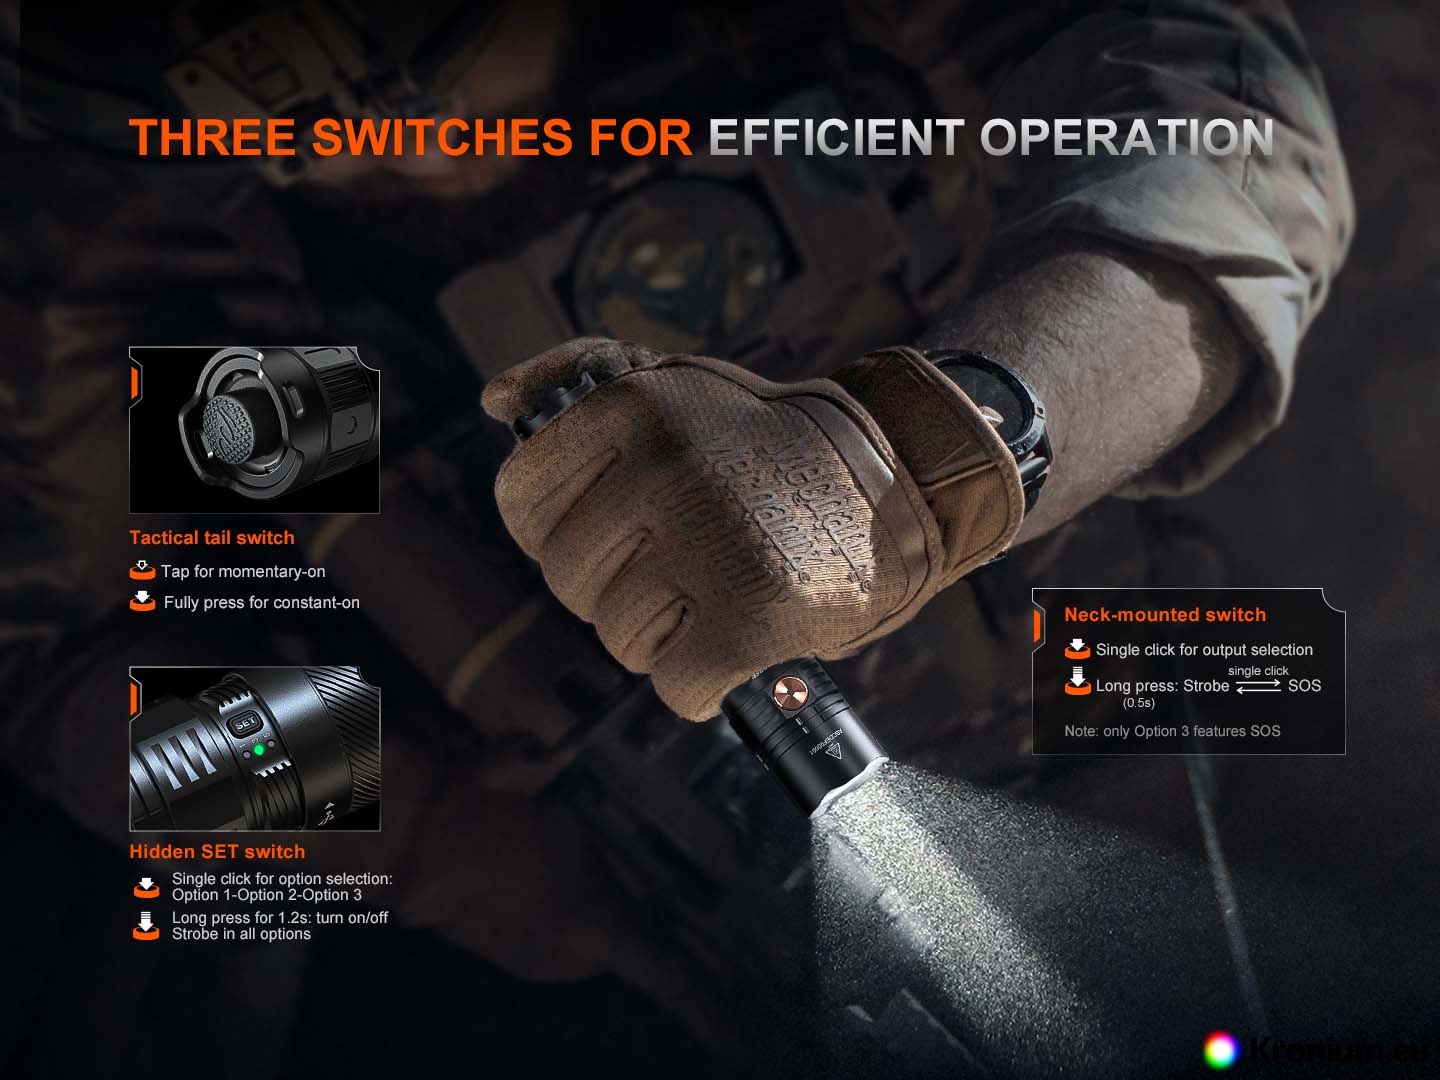
- Tactical tail switch (momentary on/off function).
- Included with the flashlight are a lanyard, holster, spare O-rings, a 21700 5000 mAh Li-ion battery and a USB-C charging cable.
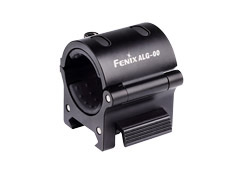
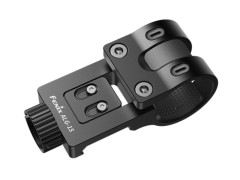
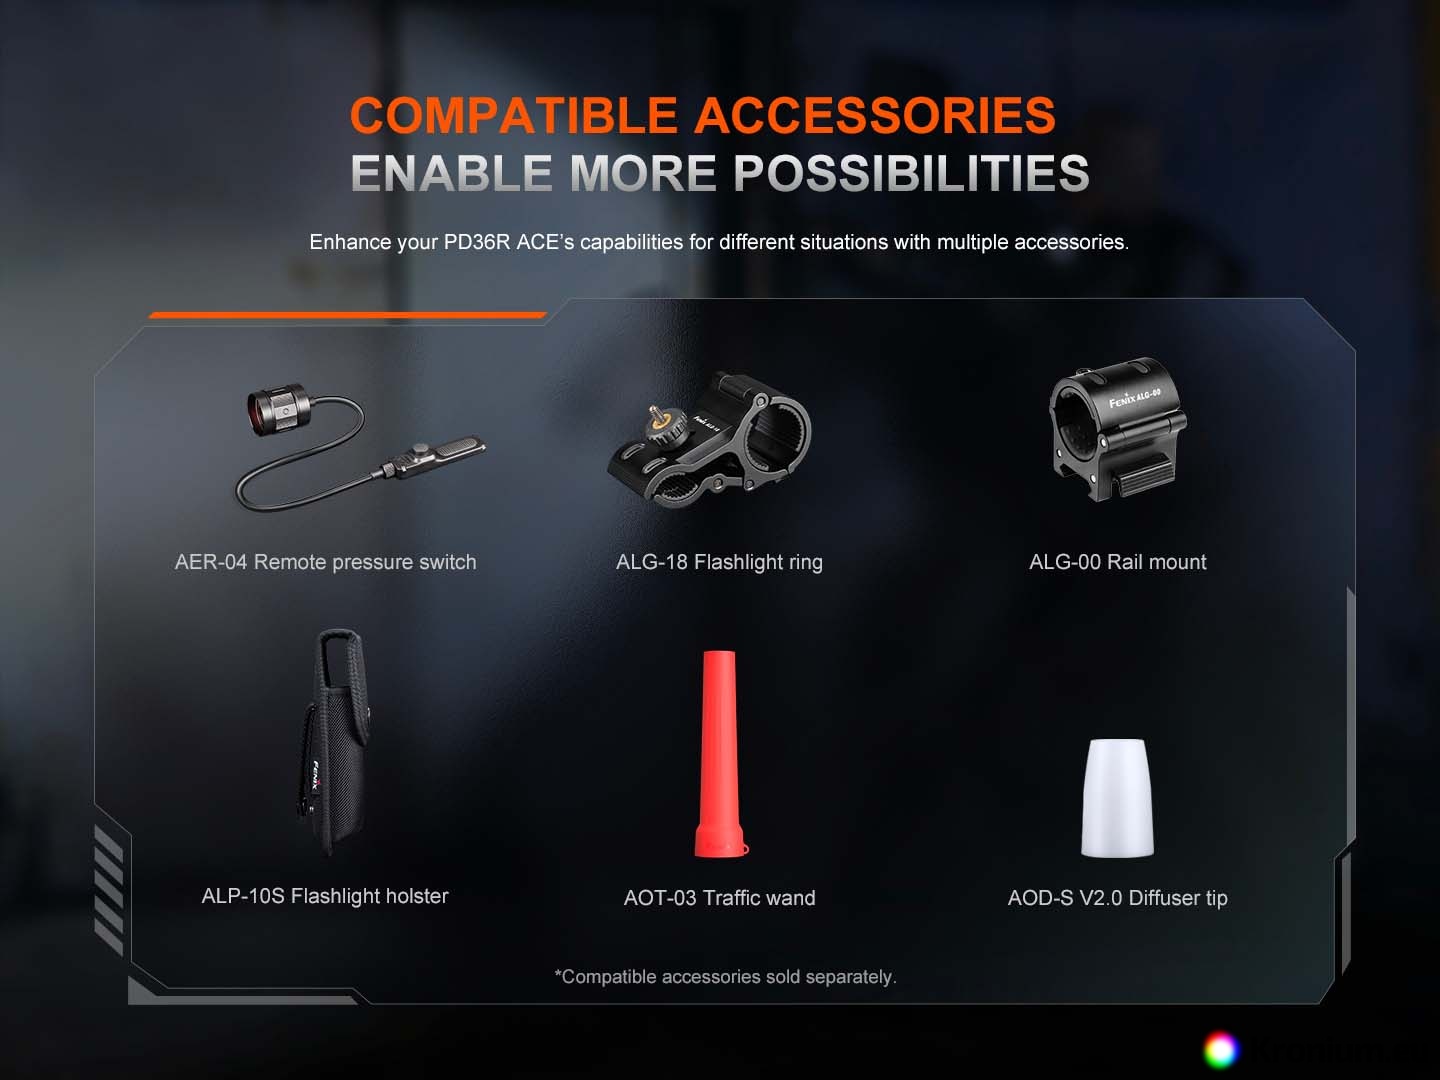
- Optional accessories available for purchase include: Fenix AER-04 remote pressure switch, AOT-03 red and white traffic wand, Fenix ALD-05 helmet strap, Fenix ALB-10 bike mount or BikeBlock flashlight mount for bicycle helmet, Fenix ALG-00 quick-release mount, ALG-15 quick-release rail mount, metal magnetic mount, ALP-10S holster, Fenix ALG-16 M-LOK mount.
Usage
From the factory, there may be an insulating tab on the battery inside the flashlight. Remove it from the battery before first use.
To turn on the light, press the tactical switch on the end of the flashlight; for momentary activation, just half-press it. By pressing the side button near the head of the flashlight, you can cycle through the constant-on modes at any time during operation. To switch to strobe mode, press and hold the side button for about 0.5 seconds. Another press will activate SOS. Pressing and holding the side button again will return you to the constant-on modes. The number of available modes depends on your selected preset; for example, the strobe can be completely disabled (see below).
Setting the Lighting Mode Presets - The SET function offers a choice of three lighting mode presets, which are listed in the following table.
-
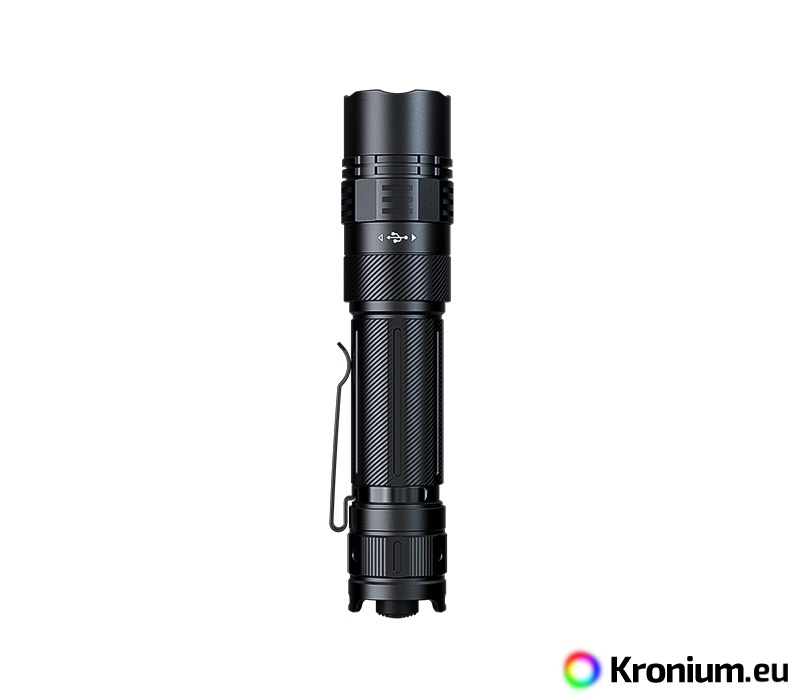
Unscrew the collar below the head of the flashlight to reveal the hidden SET switch.
-
With the light on, press the SET switch to cycle between: Setting 1 - Tactical Mode (Turbo only) → Setting 2 - Duty Mode (3 modes) → Setting 3 - Outdoor Mode (5 modes). The flashlight defaults to Setting 3 from the factory.
-
After selecting the desired preset, the corresponding indicator next to the SET button will light up green for 3 seconds to confirm the selection. This indication also shows the current number of available modes for that setting.
| Mode Presets | Eco | Low | Medium | High | Turbo | Strobe | SOS | |
| Output | 30 lm | 150 lm | 350 lm | 1000 lm | 3000 lm | 3000 lm | 150 lm | |
| Setting 1 |
|
|
|
| √ | On | Off |
|
| Setting 2 | √ |
| √ |
| √ |
| ||
| Setting 3 | √ | √ | √ | √ | √ | √ | ||
Note:
- Users can independently enable or disable the strobe mode. It is enabled by default in all presets.
- The number of modes for each preset is listed without Strobe and SOS.
Activating and Deactivating Strobe Mode - With the light on, press and hold the hidden SET switch for 1.2 seconds to activate/deactivate the Strobe mode in all presets. The flashlight will blink twice to confirm the selection.
Intelligent Memory Circuit - The flashlight memorizes the last used output level within the active preset. When turned on again, it will activate in that mode (does not apply to Strobe and SOS).
Battery Replacement - Unscrew the tail cap of the flashlight and insert the battery with the positive pole facing the reflector. Then, fully tighten the tail cap again.
Charging
- Unscrew the protective collar below the head of the flashlight to reveal the charging port and plug the USB-C charging cable into the port. After charging is complete, tighten the collar again.
- During charging, the indicator in the side button glows red; it will turn green when fully charged. The flashlight can be turned on and off by holding the side switch while charging. The tail switch is not functional during charging.
- The normal charging time for a fully depleted ARB-L21-5000 V2.0 battery is approximately 3 hours when using a sufficiently powerful power source.
Battery Level Indication - Each time the light is turned on, the indicator LED in the side button will activate for three seconds. If the indicator light is solid green, the battery is charged to more than 85%. A flashing green light indicates 50-85% capacity. If it glows solid red, it is charged to 25-50%. A flashing red light indicates that less than 25% of the battery capacity remains.
Intelligent Overheat Protection - If the flashlight's temperature exceeds 60 °C, it will automatically reduce the output. Once the temperature drops below 60 °C, the output will gradually increase again.
Low-Voltage Warning - When the voltage drops below a preset level, the flashlight is programmed to downshift to a lower brightness level. When the lowest output is reached, the battery level indicator will begin to flash red to remind you to recharge or replace the battery.
Warning
- Do not disassemble the sealed parts in the head of the flashlight yourself, as this will void the warranty.
- Place the flashlight out of the reach of children!
- Do not shine the flashlight directly into your own or anyone else's eyes!
- Unscrew the tail cap half a turn or remove the battery to prevent accidental activation during storage or transport.
- Use only an original protected 21700 Li-ion battery to avoid damaging the flashlight.
- If the protective rubber O-rings appear damaged after prolonged use, replace them. The rings should also be lubricated to prevent rubber erosion. Following these rules will keep the flashlight properly sealed against water.
- If the flashlight flickers, does not switch to higher modes, or fails to light up, it may be due to one of the following reasons:
- The batteries are nearly depleted – charge or replace the battery.
- The contacts inside the flashlight are dirty – clean them with a cotton swab soaked in alcohol.
- The head, body, or tail of the flashlight is loose – add lubricant to the sealing rings and firmly tighten both the head and the tail of the flashlight.
Warranty
Five-year warranty on the flashlight, two-year warranty on the battery.